Using a USB socket, a four-cell AA battery holder, four
rechargable AA batteries, and a four-AA battery
charger, you can have a portable 5-volt power supply
for charging or powering your Ipod or other USB-
powered device.
Don't put non-rechargable batteries in the holder
though, because you will wind up with 6 volts
instead of five. The USB socket is supposed to supply
five volts.
One nice thing about this setup is that the batteries
stick together as a set of four. They get drained
together, and they get charged together. Also there are
no complicated circuits.
STEP 1: Buy a battery holder, batteries, and a
charger
You will need a battery holder made for four AA
batteries, with red and black wires coming from it.
Radio shack sells these just like in the picture. Most
likely, your local Hobby Store carries them too, and
then you don't have to go corporate. Radio shark also
sell a type which has an on/off switch, and a cover
which is held shut by a screw. I don't recommend
that type. You don't need a switch and you don't
want to be thwarted by a screw every time you need
to charge the batteries.
You can usually find a battery charger at a thrift
store or in the free box at a college dorm building.
Often times the charger is missing its power cord,
and you can just match it up and be on your way.
Buying a charger would be silly with all the free
ones out there, ready to go in the trash because
nobody wants them.
Most chargers charge as two sets of two (one LED for
two batteries) but some charge all four cells as
individuals (one LED for each battery). Those are
better. Everyone deserves to be treated as an
individual.
You can get rechargable batteries in a set of four.
Cheap ones are 1500mAh, expensive new ones are
almost 3000mAh. Get whatever is handy, and
upgrade if you need to. Don't mix batteries that
weren't born together, they will end up beating each
other up. I am serious.
Step 2: Find a USB socket, or cable
Now you need a USB socket, to provide a place for
your Ipod cable or whatever cable to plug into.
The first picture is a pair of USB sockets from a
desktop computer. These are a good choice because
they can be found free in any computer-junk pile,
and the red and black wires are already figured out
for you. Don't cut off the other wires; you will need to
put resistors on them later.
The second picture is a socket-end of a USB extension
cable. This is the easy too, because when you cut the
cable you will see the red and black wires again.
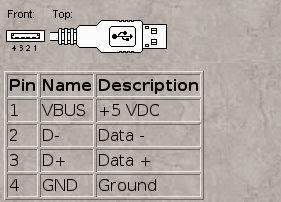
If you choose another type of USB socket, use the
diagram to make sure you are getting the Plus and
Minus correct. Red goes to Plus, Black goes to Minus.
Make sure you don't have it wrong or you will
destroy your fancy IPod. Then you can write an
instructable about how to make an altoids tin out of
your dead ipod (just remove dead ipod guts and
add hinges).
Another option, if you have an extra IPod USB cable,
is to cut the USB plug off of the cable and wire the
red and black wires to the battery holder directly. If
you do this with your only IPod cable, however, you
will never be abe to change your music again!
Step 3: Wire battery holder to USB connector
Before you start this step, put the batteries in the
charger and plug it into the wall. Rechargable
batteries are empty when you get them, usually, so
don't skip this step. In a few hours they will be full
enough to test everything.
Now you have to join the black and red wires from
the battery compartment to the USB connector. Strip
the wires, solder them, and tape them. Red to Red,
Black to Black.
The result will be that when you put four
RECHARGABLE AA batteries in the holder, you get 5
volts at the USB socket, in the correct polarity.
Step 4: Add resistors to the data lines
LadyAda has discovered that many Ipods and other
devices won't charge unless you put a couple of
resistors to the other two USB wires. Fortunately you
did not cut off those other two wires (they are
probably white and green).
Get a pair of 100K ohm resistors (brown black yellow
something, or brown black black orange something)
and twist them together at one end. Connect that
end to the red wires. The other end of each of the
resistors goes each of the remaining wires from the
USB socket.
You are basically connecting one 100K resistor
between VBUS +5VDC and Data+,
and another resistor between VBUS +5VDC and Data-.
The second image is from the Mintyboost version 1.2,
and is for reference purposes only. Ignore the right
half of the screen. Ignore the fact that the resistors do
not exactly connect to +5VDC in that schematic. If
you want to make a mintyboost though, use that
schematic.
For more information about the Mintyboost, see the
Mintyboost 1.2 FAQ:
http://www.ladyada.net/make/mintyboost/
faq.html
Step 5: Use it!
All you have to do now is put it together. Put the
CHARGED batteries into the battery holder, and
confirm that the polarity is right on the socket - you
can do this using a USB laser mouse that lights up
when its on, or a USB hub that has an LED on it.
That way, if you have it backwards or otherwise
wrong, you don't risk turning your ipod into a
thiefbait paperweight.
A hot-glue gun is the correct way to stick the USB
socket to the battery holder once you're sure
everything is done right. Make sure you don't get
hotglue into the holes of the battery box where they
will block the batteries from contacting their
terminals.
Now would be a good time to put an easy-to-read
warning sticker on your battery holder that says,
"DO NOT PUT NON-RECHARGABLE BATTERIES IN
HERE OR DAMAGE MAY RESULT!"
This is because non-rechargable batteries are 1.5
volts, which would total SIX volts - more than USB is
supposed to supply. Probably the IPod would be okay
with this, but no guarantees that it won't turn your
IPod into a shiny coffin for burnt circuitry.
That's it! Hopefully the Ipod will continue to charge
until the battery pack totals 4.0-4.4v and then stop.
At that point it is time to charge the batteries the next
time you get the chance. Unplug the Ipod from this
device when you're not using it, so that it doesn't
keep trying to charge the Ipod after it's full.


No comments